Module Assessment
Right Triangles

Right Triangles in Your Community

You can use your knowledge of right triangles to measure the height of vertical objects that are much taller than you. In this assignment, you are going to construct a tool called a clinometer to determine the height of tall objects in your community.
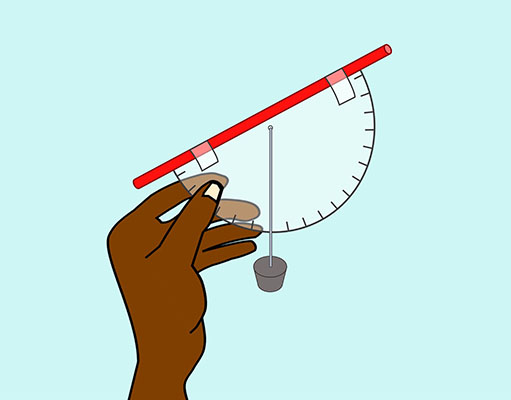
hand holding a homemade clinometer

Your homemade clinometer can help you determine the angle of elevation formed by the ground and your line of vision to the top of the object. You should select vertical objects that are taller than you and perpendicular to the ground, forming a right angle. Some ideas for tall objects in your community include light poles, tall buildings, flagpoles, and trees that are straight and upright. You should be able to stand with your feet level with the base of the object, so if you are measuring a tree on the ground, you want to stand on the ground rather than on a balcony. After you have selected three to five tall objects, use your clinometer and knowledge of right triangles to determine the height of the objects. Follow the instructions below for creating and using a homemade clinometer.

How to Create and Use a Clinometer:
  1. Gather the following materials: a plastic protractor (ideally one with a hole at the center point), a straw, tape, string, and a small weighted object (such as a stone, a metal key, a few paper clips, or a fishing sinker).
  2. Tape the straight edge of the protractor lengthwise to the straw.
  3. Cut a piece of string that is at least the length of the protractor and tie one end of it to your weighted object.
  4. Secure the other end of the string to the protractor at the hole for the center point. When holding the clinometer, the straw should be on top of the protractor and the weight should be pulling the string vertically down toward the ground (see the image above).
  5. Measure the distance from the base of the object to a safe standing position where you can comfortably view the top of the object. You can measure the distance using a tape measure. If you do not have access to a tape measure, mark the distance on a piece of string and later measure the length of the string with a ruler or yardstick.
  6. Once you are in a safe standing position and holding the clinometer properly, close one eye and use the other to peer through the straw as if you were looking through a telescope.
  7. When you see the top of the object through the straw, observe the angle measurement marked by the string on the protractor. Use this angle measurement to determine the angle of elevation.

Once you have determined the angle of elevation, use the distance from your standing position to the base of the object to determine its height. Repeat steps 5 through 7 with each of your tall objects. Remember to take into account your own height when making your calculations.

Make sure to show all your work along with any illustrations you drew to help you make your calculations. Also, explain in your own words how the clinometer works and how precise you think your measurements are in a brief paragraph. Please submit a photo of your homemade clinometer and each of the tall objects that you selected along with your assignment submission. Before you begin, review the Right Triangles in Your Community Checklist to make sure that you include all of the items required for full credit.


assignment icon After completing this assignment, please submit your work to the dropbox.