


Titrations
 Acid-Base Titration Scientific Investigation
![]() Before you begin the scientific investigation below, make sure to download the Acid-Base Titration Scientific Investigation Report. As you complete this scientific investigation, fill in any needed information on the report template. If you need more information about each section of the report, please visit the Developmental Module.
Before you begin the scientific investigation below, make sure to download the Acid-Base Titration Scientific Investigation Report. As you complete this scientific investigation, fill in any needed information on the report template. If you need more information about each section of the report, please visit the Developmental Module.
This scientific investigation is available below or in a printable document.
Introduction
In the chemistry laboratory, it is sometimes necessary to experimentally determine the concentration of an acid solution or a base solution. A procedure for making this kind of determination is called a titration. In this procedure, a solution of known concentration, called the titrant, is used to neutralize a precisely measured volume of the solution of unknown concentration to which drops of an appropriate indicator have been added. When carrying out a titration, you must be able to recognize when to stop adding the titrant. The end point of the titration occurs when a sudden change in the color of the indicator indicates that the solution is neutralized. Once the titration has come to completion, the volume of the titrant is determined. The known values are then used to calculate the solution of the solution.
Objectives
In this scientific investigation, you will:
- determine the molarity of a NaOH solution by titrating it with a standard HCl solution.
Hypothesis
Using the Procedure and Data Collection section below, read through the procedural information for this scientific investigation. Based on your understanding of the procedure, develop your own hypotheses which describe your expected results. You should consider the following questions: What amount of HCl will be needed for to reach the endpoint of the titration? What could cause experimental error in the titration process? Record these hypotheses in the Hypothesis section of your Acid-Base Titration Scientific Investigation Report.
Equipment and Materials
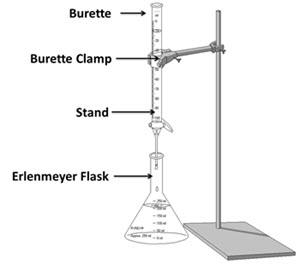
- 50 mL burette
- Burette stand
- Burette clamp
- 10 mL graduated cylinder
- 250 mL Erlenmeyer flask
- 2 - 250 mL beakers
- 10 mL pipette
- Safety goggles and gloves
- Lab apron or coat
- 0.100 M HCl
- NaOH (Concentration Unknown)
- Phenolphthalein
- Distilled water
Procedure
Important: Follow proper laboratory etiquette by wearing safety goggles, gloves, and apron or coat throughout this experiment. Follow all precautions when working with acids and bases.
- Rinse the burette thoroughly, first with tap water, then with distilled water.
- Set-up your titration experiment according to the experimental setup diagram.
- Obtain 100.0 mL of the titrant (0.1 M HCl) in a clean, dry 250-mL beaker. Remember to handle all acids with caution.
- Obtain 100.0 mL of an unknown concentration of NaOH (basic) solution in a second 250-mL beaker. Remember to handle all bases with caution.
- Using the graduated cylinder, measure and pour 10.0 mL of acid into the burette. Make sure there are no bubbles in the tip. If bubbles are present, add a little more acid to the burette, open the stopcock and allow a small amount of acid to drain through the tip until there are no bubbles in the acid. The meniscus of the acid should be at precisely 10.0 mL
- Using the graduated cylinder, add 10.0 mL of NaOH solution to the Erlenmeyer flask.
- Using the graduated cylinder add 10.0 mL of distilled water to the flask.
- Using the pipette, add three drops of phenolphthalein. Swirl the flask to mix all the ingredients.
- Place the flask under the burette containing the acid solution. To avoid splashing, be sure the tip of the burette is in the flask as shown in the experimental setup diagram.
- While swirling the flask gently, begin the titration by adding HCl to the flask drop by drop. Continue until the titration reaches the end point observed by a faint color change in the Erlenmeyer flask.
- Record the exact final volume reading on the burette in the data table. Following safety guidelines, discard the solution in the flask. Wash and rinse the flask.
- Repeat the titration two times.
Data
Use the data table provided on your Acid-Base Titration Scientific Investigation Report to record data from this investigation. The data table is also shown below.
Trial 1 |
Trial 2 |
Trial 3 |
|
|---|---|---|---|
| Initial Reading | |||
| Final Reading | |||
| Volume Added |
Data Analysis
In the Data Analysis section of your Acid-Base Titration Scientific Investigation Report, provide the responses to the following questions:
- For each trial, calculate the molarity of the NaOH solution using the equation shown below. Make sure to show all of your work.
Ma x Va = Mb x Vb
- Trial 1
- Trial 2
- Trial 3
-
Explain any reasons why the remaining volume in the burette slightly differed in each trial.
- What type of titration did this experiment represent?
Conclusion
Using the Conclusion section of your Acid-Base Titration Scientific Investigation Report, compose three to four sentences describing an overall conclusion about the the solutions you observed. Base your conclusions on your data. Were your hypotheses true or false, and how do you know? Use the data and notes that you collected from your experiment to form your conclusion. Make sure that your include information that your gained from data analysis to support your conclusion.
Experimental Sources of Error
On your Acid-Base Titration Scientific Investigation Report, provide responses to the following questions: Are there any sources of error? If so, what are they, and what could be done to minimize error?
![]() Once you have completed the Acid-Base Titration Scientific Investigation Report, please submit your work to the dropbox.
Once you have completed the Acid-Base Titration Scientific Investigation Report, please submit your work to the dropbox.